There are many ways you can choose a shower drain. The choice normally depends on your shower base, the kinds of pipes in your home, and the manufacturer’s suggestion for both the shower pan and the drain.
Remember that the shower drain assemblies are normally made to fit a 2-inch drainpipe, not the 1 1/2-inch pipe usually found on tubs. Since showers have a low threshold for flooding, a 2-inch pipe is the perfect size since it helps the water drain quicker than a 1 1/2-inch pipe. So, if you’re switching from a tub and shower combination to a shower, you will most probably have to change the drain pipe size.
Each drain assembly has its own method of installation:
- Compression-style shower drain
- Solvent-glued drains
- Tiled drains
What will you need?
Equipment / Tools
- Hacksaw or tubing cutter
- Channel-lock pliers
- Caulk gun
- Screwdrivers
Materials
- Shower drain assembly
- Silicone caulk
- Plastic pipe primer (where needed)
- Plastic pipe solvent glue (where needed)
Instructions

How to Install a Compression-Style Shower Drain
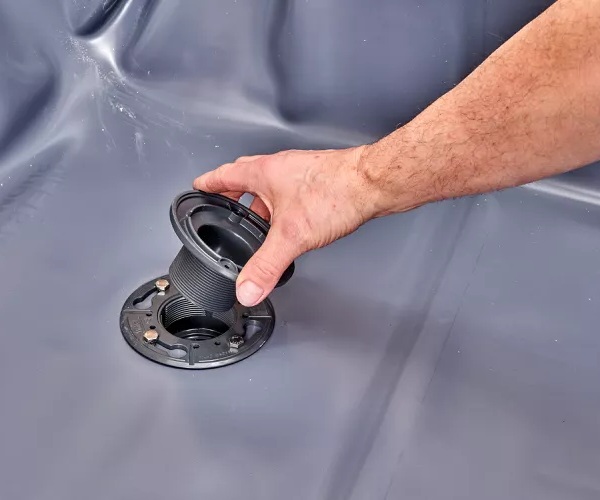
Compression-style shower drains are attached to your home’s drain pipes with compression washers and nuts. This style is normally easier to install than solvent-glued drains if your house doesn’t have a basement or crawlspace access to the area below the shower base. This drain’s assemblies are available in ABS, PVC, or brass, though PVC is slowly becoming the most popular. Any material type can be used with steel, acrylic shower bases, or fiberglass.
When installing a compression shower drain, the fitting is usually installed into the shower base before the base is positioned.
-
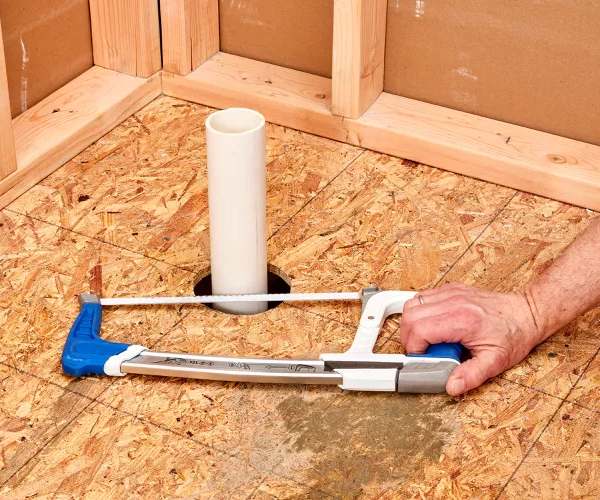
Trim the drainpipe
For a compression-style shower drain fitting, the drainpipe must be at least 3/4 to 1 inch below the lip of the shower drain but do as per the manufacturer’s recommendations. It is necessary to test-fit the shower base to mark the accurate height and then remove the base to cut the pipe.
You can trim the drain pipe with a hacksaw or plastic tubing cutter. If you’re using a hacksaw, ensure to make the cut flat and level.
2. Attach the drain assembly
First, apply a bead of silicone caulk around the top flange of the shower drain opening. Next, insert the drain assembly into the opening. Put the rubber sealing washer and cardboard friction washer over the drain assembly tailpiece from under the shower base. Thread the mounting nut onto the tailpiece and tighten it down with channel-lock pliers. If there is any remaining caulk that has oozed out near the drain assembly, wipe it away.
3. Position the Shower Base
Position the shower base carefully so the drainpipe extends up into the drain assembly.
4. Insert the compression gasket
After positioning the shower base, it is time to Place the soft rubber compression gasket down into the drain opening so it fits properly around the drainpipe. Thread the compression nut into the drain opening and tighten it. Compression-style drains normally come with a fitting tool that assists you in tightening the nut from the inside of the drain using a screwdriver. As tightened, the runner gasket is compressed against the drainpipe creating a watertight seal.
Take away the fitting tool and snap the grate over the drain opening. Let the silicone be fine for a full 24 hours before using the shower.
How to Install a Solvent-Glued Shower Drain
We only recommend solvent-glued drain assemblies when you have access below the shower from an undone basement or crawlspace. If there is no access to this, a compression-style drain assembly would be a better option.
The assemblies of solvent-glued shower drains are normally PVC plastic, though older ones may use ABS plastic. If you have a plastic drainpipe, then remember to match the shower drain to the type of plastic in the drain system. Similar to compression-type shower drains, this type can be used with steel, fiberglass, and acrylic shower bases.
In the case of solvent-glued, it is tougher to get the pipe measurement correct. Therefore remember to measure carefully and test-fit the pieces before gluing.
-
Adjust the drainpipe
Consult the manufacturer and their recommendations for adjusting the drainpipe to the required height. For many fittings, this could mean trimming off the pipe at the level of the subfloor.
2. Prepare the Drain Assembly
The majority of solvent-glued shower drain assemblies come in several parts: a strainer cover; an upper body that extends down through the drain opening in the shower base; and a lower piece with female threads that screw onto the upper body, with a smooth female socket that is glued onto the drain pipe.
Start by disassembling all parts of the drain assembly. Keep the cardboard friction washer and the rubber sealing washer aside.
3. Insert the Upper Body of the Drain Assembly
Apply a bead of silicone caulk around the flange of the shower drain opening. Set the upper body of the drain assembly into the drain opening and press down quickly.
4. Secure the Drain Assembly
Place the rubber sealing gasket from below the shower base and then the paper friction gasket, over the male threads of the upper body. Next, thread the lower body of the drain assembly onto its upper body. Tighten the drain assembly by screwing the pieces together until silicone oozes out around the flange of the drain opening. Wipe off any remaining silicone. Attach the metal grate to the top of the drain assembly.
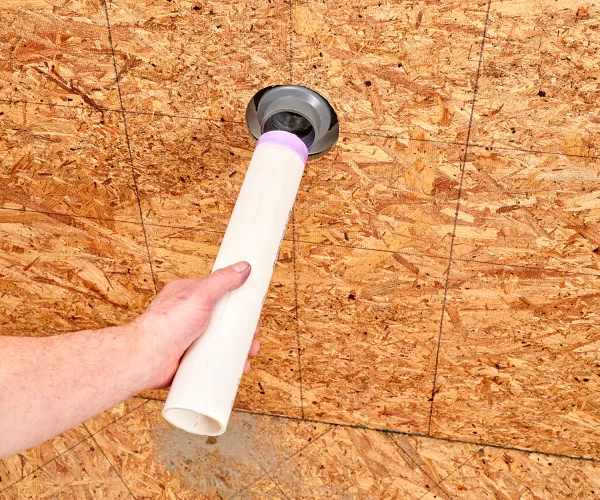
5. Solvent Glue the Drainpipe to the Drain Assembly
Spread plastic pipe primer around the outside edge of the drainpipe and the inner surface of the smooth socket on the lower drain body from the floor below the shower base. Spread a thin layer of solvent glue evenly on the surfaces. Quickly slide the drain pipe into the socket on the drain body and hold it in place until the bond becomes harder. Let the solvent glue and silicone caulk cure for a full 24 hours before using the shower.
How to Install a Tile Shower Drain
Drain assemblies for custom-tiled showers come in three-piece units, each of which is installed at different phases during the process of the tile pan installation. The waterproof membrane liner for the shower is kept between two lower flanges, which are tightened together. This liner is the lowest layer of water resistance and will ensure anything getting in under mortar will still flow down into the drain and not leak through the shower pan. The last piece, the strainer assembly, is the only piece that is seen when the shower pan is completed.
If a tile professional is installing your custom shower base, they will handle the drain installation as part of the process so you don’t have to worry about anything.
-
Install the Bottom Flange
After cleaning and preparing the subfloor of the shower, install the bottom flange of the shower drain into the drainpipe, usually by solvent gluing.
After this process is completed, a bed of mortar is troweled around the drain opening, creating a 1/4-inch-per-foot slope away from the walls and toward the drain. Once the mortar bed has dried, a waterproof membrane liner is installed over the floor and the lower flange of the shower drain. Use silicone caulk to seal the liner to the drain flange, then trim away the liner around the drain opening.
2. Install the middle flange
Insert the middle flange of the drain fitting over the liner and drain opening with the help of bolts to secure it to the bottom flange beneath the liner. The liner will be tightly sandwiched between the flanges. You can pour water over the shower pan to check the liner for leaks.
3. Install the Strainer Assembly
Attach the drain strainer assembly to the drain, so it goes above the liner. This piece usually has male threads that screw down into the female threads of the middle flange. The degree of extension for the strainer assembly depends on how the tile will be installed—follow the manufacturer’s instructions. It may be as much as 1 1/2 inches if you are laying tile on a solid mortar bed.
Now that everything is ready, you are all set for the rest of the ceramic tile installation. Usually, this consists of a second layer of mortar, then ceramic tile applied over the mortar. Make sure the tile is grouted, sealed, and cured before you use the shower.